

You are using an out of date browser. It may not display this or other websites correctly.
You should upgrade or use an alternative browser.
You should upgrade or use an alternative browser.
OT: Retro Wrangler/Willys Pickup (long)
- Thread starter jscherb
- Start date

jscherb
CJ-8 Member
- City
- Elmira
- State
- NY
Here are some in-progress shots of the Retro fender mold. So far everything is going extremely well. 
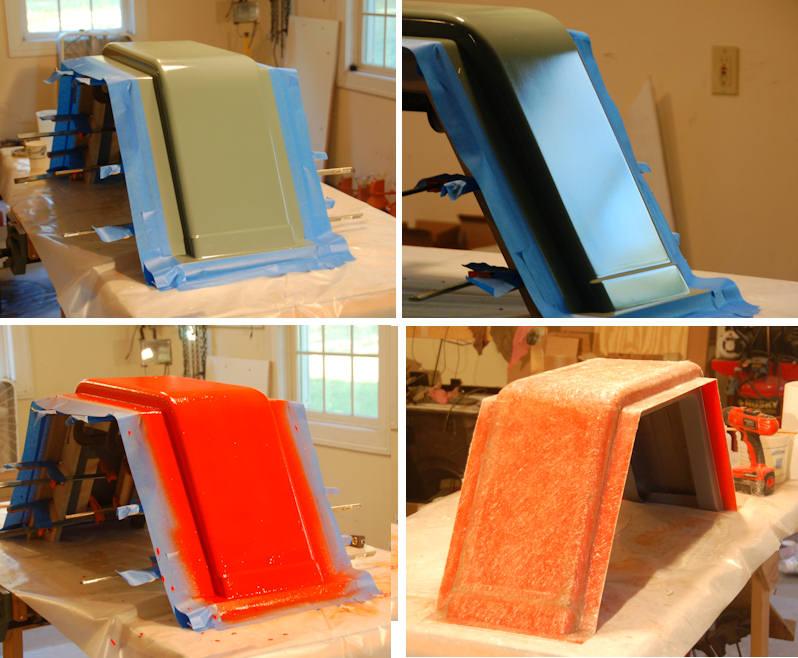
Top row below shows the mold all ready to be sprayed with gelcoat. The wax and PVA makes a really nice smooth surface for the gelcoat. This time I sprayed the PVA with my normal spray gun instead of the crappy aerosol Preval sprayer and it made a world of difference.
Lower left is just after the gelcoat was sprayed on.
Lower right is the completed shell with the side dams removed and the edges of the fiberglass trimmed. I didn't take any in-progress shots, was too focused on actually getting the work done to worry about pictures. But basically I did three layers of polyester resin with 1.5 ounce fiberglass matt. The first two layers were "layup resin", which stays tacky, and for the third layer I used general purpose resin, which cures completely. For the third coat, I could have used the wax additive for the layup resin to make it cure completely, but I'm running a little shorter on layup resin than I planned so rather than using it up and waiting for a mail order I picked up some GP resin locally.
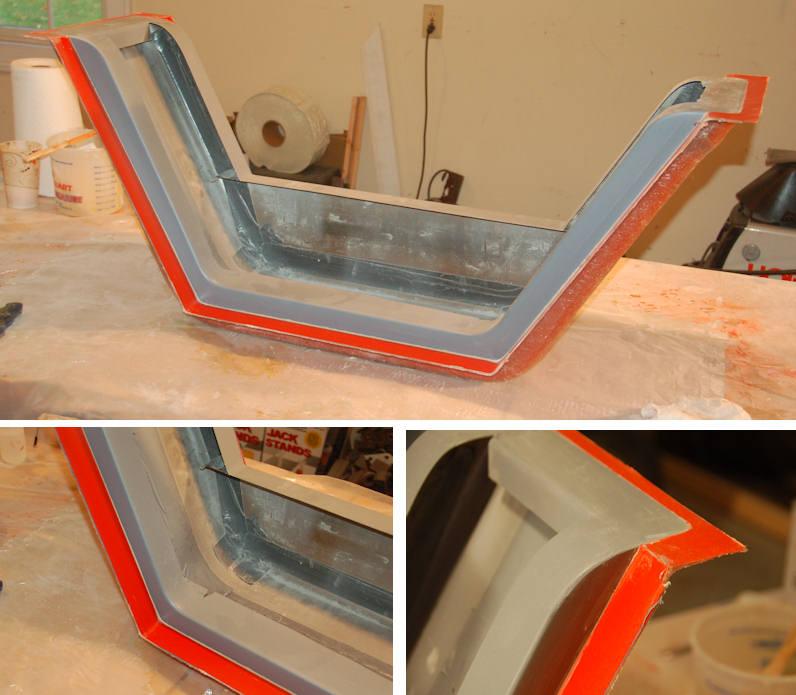
The shots below show some details of the mold shell. Today I'll be making the side parts of the mold, the sides form the return lip on the inside of the fender, and have a bolt flange so they can attach to the main mold shell. The process will be the same - three coats of wax, followed by a spray of 3 coats of PVA mold release, followed by three layers of resin and mat.
Top row below shows the mold all ready to be sprayed with gelcoat. The wax and PVA makes a really nice smooth surface for the gelcoat. This time I sprayed the PVA with my normal spray gun instead of the crappy aerosol Preval sprayer and it made a world of difference.
Lower left is just after the gelcoat was sprayed on.
Lower right is the completed shell with the side dams removed and the edges of the fiberglass trimmed. I didn't take any in-progress shots, was too focused on actually getting the work done to worry about pictures. But basically I did three layers of polyester resin with 1.5 ounce fiberglass matt. The first two layers were "layup resin", which stays tacky, and for the third layer I used general purpose resin, which cures completely. For the third coat, I could have used the wax additive for the layup resin to make it cure completely, but I'm running a little shorter on layup resin than I planned so rather than using it up and waiting for a mail order I picked up some GP resin locally.
The shots below show some details of the mold shell. Today I'll be making the side parts of the mold, the sides form the return lip on the inside of the fender, and have a bolt flange so they can attach to the main mold shell. The process will be the same - three coats of wax, followed by a spray of 3 coats of PVA mold release, followed by three layers of resin and mat.
jscherb
CJ-8 Member
- City
- Elmira
- State
- NY
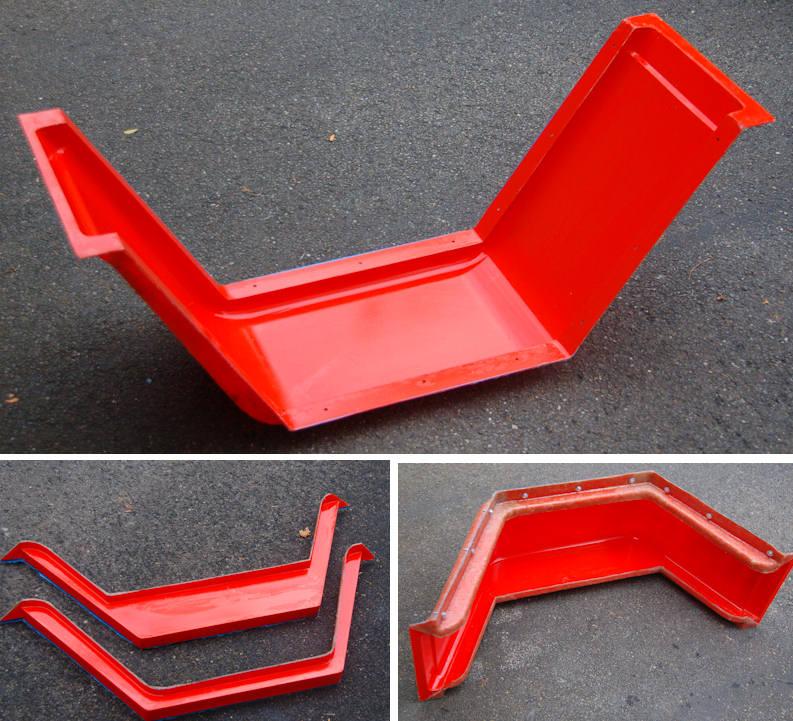
Here are some shots of the completed mold. Everything worked out as planned. It's a three-part mold, as you can see, and the separate sides bolt on to the main shell to form the turned in lips on the inside of the wheelwell. Next I've got to make an actual fender in the mold, probably do that later this week.
jscherb
CJ-8 Member
- City
- Elmira
- State
- NY
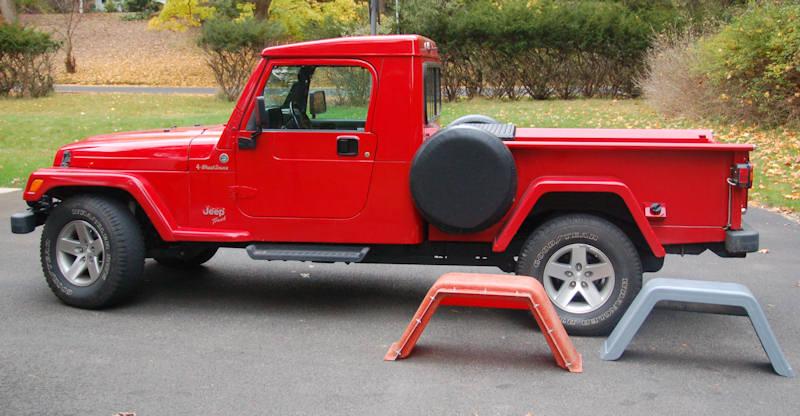
Oh and BTW, in this photo, you can see one of the differences between the current Retro fender and the new one (well actually the gray master). The side face on the new one is wider, to better match the side face of the front flare. I know it's a fairly small detail and some of you probably think I'm crazy, but this is one of the reasons I decided to make new fenders - got to keep striving for perfection in the implementation of the Retro design... 
jscherb
CJ-8 Member
- City
- Elmira
- State
- NY
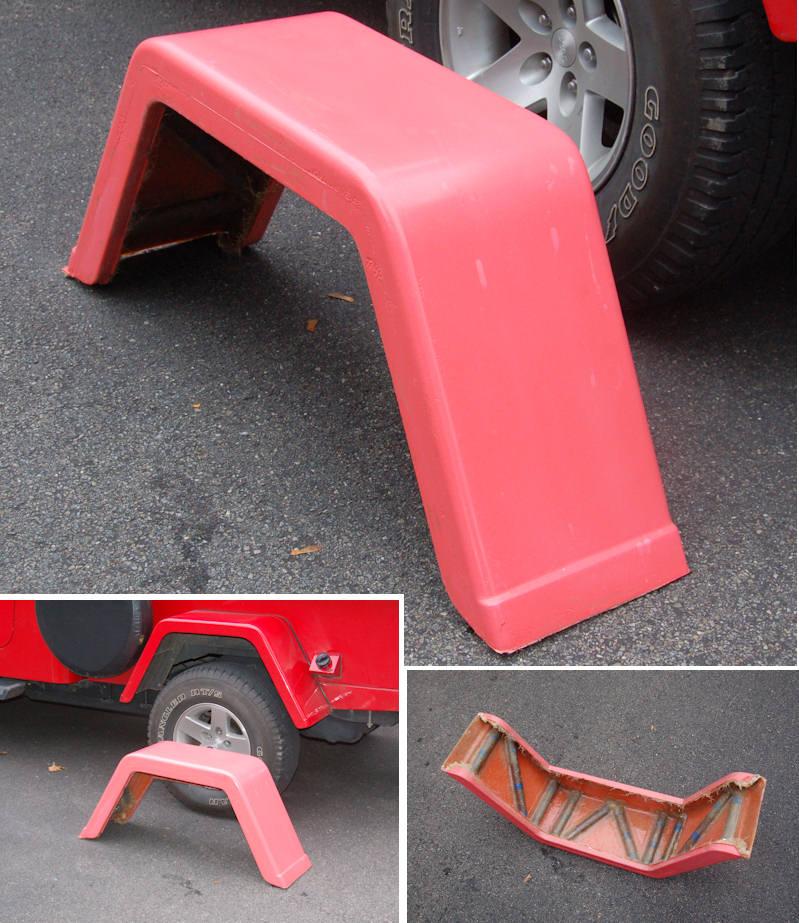
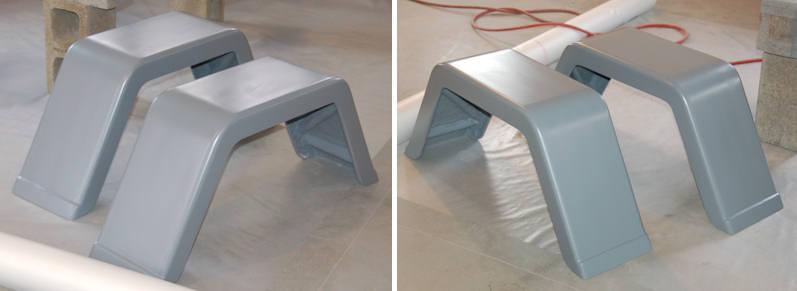
Ok, before any of you start in on me, no I am not planning to paint the Retro pink!
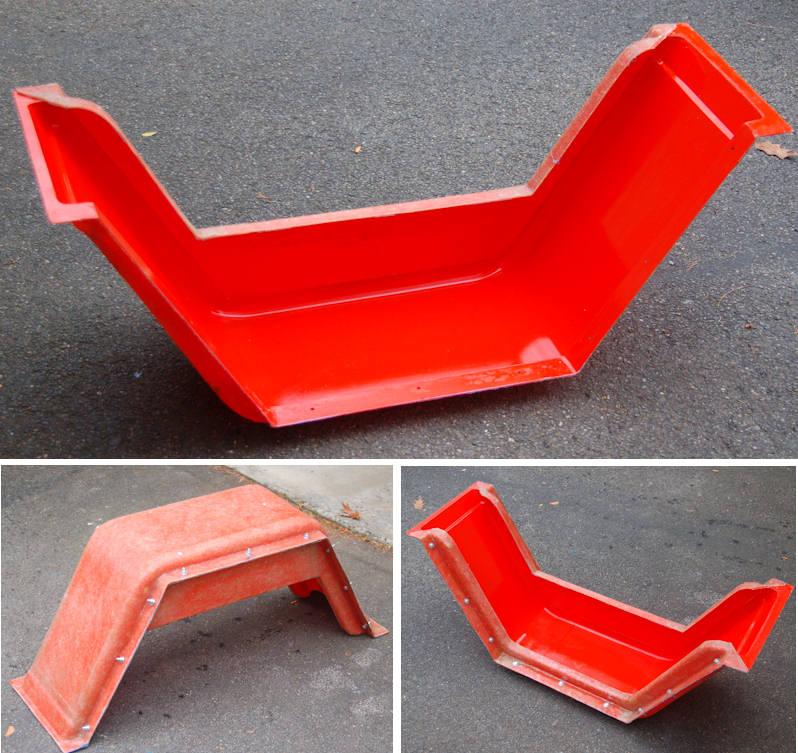
Here's the first fender out of the mold. I had planned to tint it red so if stones chipped the paint the chips would show red, but it was taking a huge amount of tint to change the color of the white gelcoat. I used half of the jar on this one fender, so I had to choose between using the whole jar to go more red and waiting another week while i mail ordered more red for the next fender, or stopping at halfway and saving the other half of the jar for the second fender. Iwas also worried that too much tint might weaken the gelcoat, so I stopped at half the jar. Oh well.
But as for the fender itself, I'm really happy with how it turned out. There's a little bit of alligatoring in the gelcoat near the parting line on the side face of the fender, I guess the gelcoat was a little thicker there and not quite as cured as the rest when I started to lay up the fiberglass. It's easily fixed with a little filler, so no big deal. There's a fine line between "cured enough" and "too far cured" for gelcoat to adhere to the fiberglass just right, I'll need to err maybe 10 minutes on the other side of what I've done to eliminate all alligatoring in the next fender.
The fenders weigh probably less than half of what the original 16-gauge steel Retro fenders weigh, but they are more rigid. I think that's a good combination. The bottom right photo shows the inside of the fender, it's stiffened with half-rounds of cardboard cut from wrapping paper tubes - the 'glass is fairly transparent so you can see them and the tape I used to help them keep their form. This will be painted over. Also, I haven't trimmed the inside lip of the wheel arch yet, so it looks a little ragged from the edges of the fiberglass. This will trim up fine and will make the inside lip look just like the steel fender. Definitely worth the extra effort of the three-part mold.
The flat surfaces are smooth and flat, and the curves came out perfect, so other than a bit of sanding and filling to get rid of the parting line and the slight bit of alligatoring, this fender will finish up perfectly.
I'm going to declare success and get on with making the second fender now. And next week I'll be doing the Gaucho fender mold and those fenders, but not in pink!!
Here's the first fender out of the mold. I had planned to tint it red so if stones chipped the paint the chips would show red, but it was taking a huge amount of tint to change the color of the white gelcoat. I used half of the jar on this one fender, so I had to choose between using the whole jar to go more red and waiting another week while i mail ordered more red for the next fender, or stopping at halfway and saving the other half of the jar for the second fender. Iwas also worried that too much tint might weaken the gelcoat, so I stopped at half the jar. Oh well.
But as for the fender itself, I'm really happy with how it turned out. There's a little bit of alligatoring in the gelcoat near the parting line on the side face of the fender, I guess the gelcoat was a little thicker there and not quite as cured as the rest when I started to lay up the fiberglass. It's easily fixed with a little filler, so no big deal. There's a fine line between "cured enough" and "too far cured" for gelcoat to adhere to the fiberglass just right, I'll need to err maybe 10 minutes on the other side of what I've done to eliminate all alligatoring in the next fender.
The fenders weigh probably less than half of what the original 16-gauge steel Retro fenders weigh, but they are more rigid. I think that's a good combination. The bottom right photo shows the inside of the fender, it's stiffened with half-rounds of cardboard cut from wrapping paper tubes - the 'glass is fairly transparent so you can see them and the tape I used to help them keep their form. This will be painted over. Also, I haven't trimmed the inside lip of the wheel arch yet, so it looks a little ragged from the edges of the fiberglass. This will trim up fine and will make the inside lip look just like the steel fender. Definitely worth the extra effort of the three-part mold.
The flat surfaces are smooth and flat, and the curves came out perfect, so other than a bit of sanding and filling to get rid of the parting line and the slight bit of alligatoring, this fender will finish up perfectly.
I'm going to declare success and get on with making the second fender now. And next week I'll be doing the Gaucho fender mold and those fenders, but not in pink!!

- City
- Cobourg, Ontario, Cana
- State
- da
AWESOME WORK!!! (as usual)
just a thought... would the fender be able to support the weight of someone? you never know, someone might sit on it or step on it from the bed or something... wouldnt it be better to use wood to strengthen the fenders rather than gift wrapping tubes? gift wrapping tubes should only be used to beat up your friends ninja sword style..
just a thought... would the fender be able to support the weight of someone? you never know, someone might sit on it or step on it from the bed or something... wouldnt it be better to use wood to strengthen the fenders rather than gift wrapping tubes? gift wrapping tubes should only be used to beat up your friends ninja sword style..
jscherb
CJ-8 Member
- City
- Elmira
- State
- NY
AWESOME WORK!!! (as usual)
just a thought... would the fender be able to support the weight of someone? you never know, someone might sit on it or step on it from the bed or something... wouldnt it be better to use wood to strengthen the fenders rather than gift wrapping tubes? gift wrapping tubes should only be used to beat up your friends ninja sword style..
Thanks!
If my plan was to build fenders that could be stepped on (either steel or fiberglass), first I'd put a diamond plate step on the top so the paint wouldn't get scratched
. But I'd also build an entirely different framework inside the fender to support weight, probably with some triangular steel brackets supporting the upper flat part of the fender against flexing down from weight.My goal in adding the ribs built on the cardboard tubes wasn't actually strength, the goal was rigidity. The goal was to increase the rigidity of the fender so it didn't flex over bumps or at high speed. Fiberglass is far less rigid than steel, but in terms of flex, this fiberglass fender is much better than the heavy steel fender - the steel fender has so much mass it's hard to keep it from flexing a bit over bumps - the mass of the steel trumps the rigidity inherent in the steel.
At much less than half the weight of the steel fender, in this case the rigidity of the fiberglass fender trumps mass and there will be far less flex over bumps than the steel fenders, so that design goal was met.
But back to your question - what if someone stepped on the fender? First of all, if they did that and scratched my fenders they wouldn't live long enough to see if the fender supported their weight or not
. Seriously, though, I wouldn't want to step on either one - the steel might bend; the fiberglass might crack. Without an internal framework to support that kind of weight, I wouldn't want to step on either fender. Putting wood inside the fiberglass ribs instead of cardboard wouldn't actually improve the strength of the fender in the case where someone stepped on it, without some triangular bracing, the wood wouldn't do any more than the cardboard to prevent the fender from flexing at the ends of the ribs where they join the sides of the fender. The steel fender might take a permanent bend, and the fiberglass fender might crack, but the wood used as I used the cardboard wouldn't change that - some triangulation would be required.Please don't step on my fenders, or my hood, or my hardtop... none of them are designed to be steps.
jscherb
CJ-8 Member
- City
- Elmira
- State
- NY
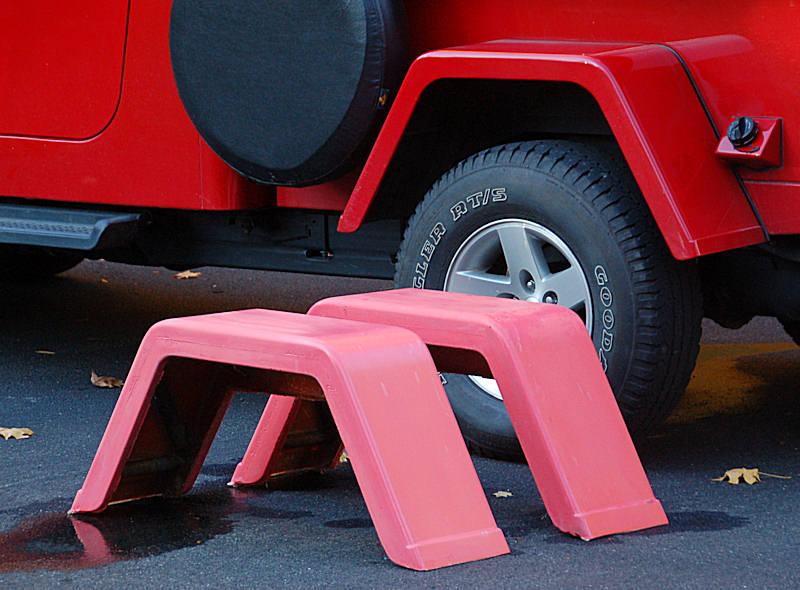
Got the second fender done today. Now they've got to be trimmed, have the minor gelcoat blemishes fixed, epoxy primed and block sanded, and finally painted. It's good to be done with the fiberglass phase of this project, fiberglass work isn't the most fun thing I can think of.
I'm going to be working on the Gaucho fenders now so I'll be alternating between projects this week.
I'm going to be working on the Gaucho fenders now so I'll be alternating between projects this week.
jscherb
CJ-8 Member
- City
- Elmira
- State
- NY
I got an email yesterday from a magazine editor - another article based on the Retro project will be appearing in print soon. I'll let you know when it is on the news stands.
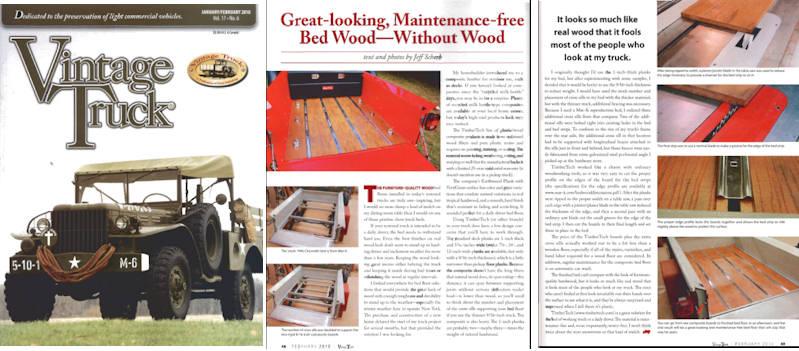
Got my copy of Vintage Truck in the mail today, here's the article. This one isn't about the Retro per se; it's about the "plastic" bed wood I used, so we didn't show any shots of the entire truck - because only the bed is "vintage"
Great build. tons of tech. I love it.
I'm mostly interested in the tech about the hard top construction. I posted a couple things to your "Safari Cab" custom hardtop project on jeepforum.com but thought any further questions may be better placed here.
I was asking about getting some better pictures of how you adapted the new hard top to the TJ windshield because the first time I breezed through all the pages on this thread, all I saw was a ton of red x’s, and hardly any pictures. Well turns out I didn’t confirm my registration through my email. I have since gone through and red all the posts about the construction of the half cab and really enjoyed it. I greatly appreciate all the time you have spent to post all the visual aids along with great write-ups.
Anyway, now that I have seen how you went about building the cab, I think I’ll be building mine out of steel as well. I will have to finish my current build on my jeep first but once that is done I will dive into the hard top.
I realize, that most likely, I will not be able to find a CJ-10a or a world cup top so I will have to improvise and source other vehicles for sheet metal. I would like to build something that resembles the attached photo shop picture of my jeep.
In your travels, have you ever noticed other more common vehicles that would be of use for building steel half cabs? I know it’s a long shot but I thought I would ask. I’m sure all it will take is some walking time through the local auto salvage yards. How about a good source for the rear sliding glass window. I think the CJ-10a is the perfect size.
Thanks again for sharing all this great tech.
Last edited:

- City
- Dexter
- State
- MI
I see that you want steel, but you know that you can just buy a half hard top exactly like that in fiberglass from GR8TOPS right? The other thing you'll need in your build is a bulkhead since it doesn't look like you'll be closing out the cab. GR8TOPS makes those to mate to the tops so you'd be set.
Even if you don't get a top from them, they sell the rear sliders you would need.
And it's not all that hard to find -10a's they're up for gov't auction all the time. The top that was used in this build was one I bought off someone who didn't want it for their -10a build and I passed it along to Jeff for this. The top breaks down in to three pieces that could be boxed quite flat or shipped as is (I made a wooden cover for the glass in the rear panel of the top I shipped to Jeff and it made it through UPS shipping fine with no other packing).
Note that you can get a GR8TOPS sanded for application of matching paint or I think there's an army green option.
Last edited:
jscherb
CJ-8 Member
- City
- Elmira
- State
- NY
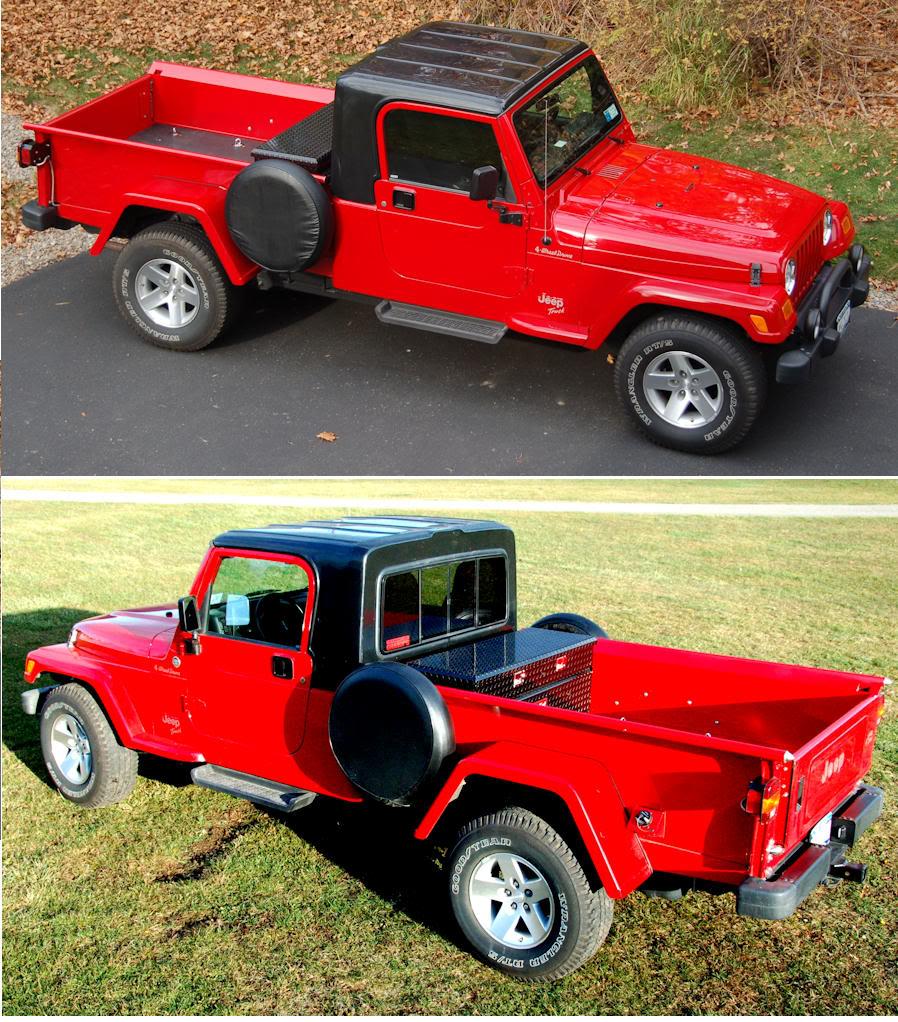
Eric's right, the Gr8Tops top is really nice - here's a few shots of one on the Retro. Unless you have a very specific styling goal you're going for, like I did on the Retro, it might not be worth trying to fabricate a top from steel. It's hard to tell from your drawing what you're trying to do that would be very different from a top styled like the Gr8Tops top - can you give some more info on what you're trying to achieve style-wise? Maybe that will help us come up with some donor sheet metal ideas...
I have seen the Gr8Tops and i really do like them. I do believe this would be a great source for the rear window but i would like to salvage as much of the parts as possible to keep the cost down.
I could buy the GR8top but that would mean missing out on a fun project, and I’m not sure if it would line up with what I already have fabbed up anyway. I made many changes to the interior of the stock tube which may not line up with the GR8top. After spending so much time on all the sheet metal work on my jeep i have found that i really enjoy it and would like to test my abilities on a steel top. If it doesn't turn out i can just run the stock tops like everyone else i guess.
I will for sure keep my eyes open for a CJ-10a top, I just thought they were crazy rare.
Attached are a couple pics of how the interior of my jeep differs from your standard TJ tub. I relocated the stock tank and built a cover over it so that the tank wouldn't be in the cab with me. The tank is open to the air from underneath the jeep. Once the cover was built i constructed a shallow lockable toolbox above it. The toolbox was built up high enough to be at equal height as the side rails of the jeep. This acts as my bulkhead, were the hard top will rest on.
Basically i love a challenge, enjoy metal working, always wanted a half cab for my TJ, and always need a project to work on. I can’t think of a better project!! Also, if i can't get it to look or work like i want, i can ditch it and run the stock top.
jscherb
CJ-8 Member
- City
- Elmira
- State
- NY
I suppose I'd be looking at sheet metal from vans to see if I could find donor pieces. Most vans have sloped sides and rear walls, and you'll probably want something much more vertical for a Jeep cab, but with some adjustments, you could make van sheet metal more vertical. The roof panel from a van would have useful curved corners, all you'd have to do is section it to shorten and narrow the panel.


jscherb
CJ-8 Member
- City
- Elmira
- State
- NY
speaking from ignorance here but how about a DJ top? Seems like there are old postal jeeps in the yard all the time....
We did a thread on that idea a while back...
https://www.cj-8.com/forum/showthread.php?t=21856&highlight=postal
thanks for the tip on vans, they look like they would be a great place to source parts from. I like the curves of the top on the van you show above, probably has a ribbed roof, i like the drip rails along the top that could be utilized, i also like the longitudinal bends about midway down the side of the van. Thanks for letting me pick your brain a little, i appreciate it.
We did a thread on that idea a while back...
https://www.cj-8.com/forum/showthread.php?t=21856&highlight=postal
wow, thanks for the link, lots of good info.
jscherb
CJ-8 Member
- City
- Elmira
- State
- NY
Well after a long delay I'm back at work on the new fiberglass Retro fenders. I made these in the fall at the same time I did the Gaucho fenders, but never got around to finishing them. Yesterday I sprayed them with epoxy primer, and tomorrow morning I'll spray them with three coats of high-build primer/surfacer, followed by hand block sanding with 400 grit. Probably after that there will be another coat of primer/surfacer, followed by 600 grit block sanding, then they will probably be ready to go to the body shop for color/clear.
A side story... I had to stop by the Jeep dealer to see about a part today, and as I was walking through the showroom a salesman pulled me aside and said "Can I talk to you for a minute?" I figured, oh no, he's going to try to sell me a new car or something, but no - he told me that at least fifteen people have come in the showroom lately asking to "see the new pickup from Jeep". When he tells them Jeep doesn't make a pickup, he said these people tell him he's wrong because they've seen one driving around town. Then he breaks the news to them that the one they've seen is home-made
A side story... I had to stop by the Jeep dealer to see about a part today, and as I was walking through the showroom a salesman pulled me aside and said "Can I talk to you for a minute?" I figured, oh no, he's going to try to sell me a new car or something, but no - he told me that at least fifteen people have come in the showroom lately asking to "see the new pickup from Jeep". When he tells them Jeep doesn't make a pickup, he said these people tell him he's wrong because they've seen one driving around town. Then he breaks the news to them that the one they've seen is home-made