
• Notice for iPhone users: DO NOT use the image size reduction option when uploading photos to the forum. This causes portrait images to post as landscape. We have added a warning to the image insert pop-up as well.

OT: Retro Wrangler/Willys Pickup (long)

Today was mostly finish welding/grinding on the roof flange and I also fabricated and installed a mounting bracket for an overhead console. The photo on the left shows the console as if you're looking up at the roof. I picked up this little console at the Pick n Pull last week for $5, it's from a Chevy minivan; the color is a good match for the interior of my truck, and it's a simple design that looks like it could belong there. It's got two map lights and a storage compartment.

On the right you can see the bracket minus the console (the roof is now laying upside down on the workbench). It is a frame welded up of 1/2" steel angle, pop-riveted to the header and the center rib. The console screws into cross brackets made from sheet metal, and these are just pop riveted onto the frame - if I ever wanted to mount something other than this console up there the pop rivets could be removed and the cross brackets repositioned to support something different. I like to design things to allow future options :)

I've put Dynamat under the bracket; I plan to put it on the inside of all the hardtop panels but had to put it here today before the bracket was attached. The headliner will cover all of it up and go between the console and the bracket.

Tomorrow: cutting a hole in the rear of the roof panel for the CHMSL and fabricating a bracket to hold the satellite antenna.

attachment.php
 
Today's work was the CHMSL (Center High Mounted Stop Light, for those of you who aren't familiar with the acronym).

This CHMSL is from a 90's Dodge Dakota pickup. I picked it because 1) it's a fairly generic design that wouldn't look out of place on the Retro Wrangler, 2) is also has the cargo lights for the bed, and 3) it is from the MOPAR parts bin so conceivably it could be used on a modern Jeep pickup :)

I also made a bracket for the Sirius antenna. My Jeep came with factory Sirius radio, and the stock antenna is mounted on the roll bar above the driver's left shoulder. But that won't work under a metal hardtop, so I had to go to a different antenna. I picked up a magnetic Sirius antenna but I didn't want to stick it on the roof, I don't like that look, so I made a bracket that sandwiches between the CHMSL and the body. I also got an extension cable for the antenna, I'll run the cable from the receiver to the stock antenna location, and when the hardtop is on the cable will plug into the antenna on the CHMSL bracket; when the soft top is on the cable will plug into the stock antenna.

I did the wiring harness for the hardtop; it connects to the Jeep with a 4-conductor flat trailer plug. The Jeep half of that plug and harness is already in place, it was feeding the CHMSL I put in the soft top.

In the first photo you can also see I've started the finishing/filler on the CJ-10 part, working on blending in the 1/2" height extension at the top and the places where I took a little out of the length of the sides.

Probably won't get anything done this weekend; next up for the beginning of next week - making the headliner.

attachment.php
 
very nice indeed

very nice..

had you dropped by your body shop guys lately and shown them all your handiwork on the top yet? I'm guessing they will be pretty impressed as well.

Matt
 
donaghy said:
very nice..

had you dropped by your body shop guys lately and shown them all your handiwork on the top yet? I'm guessing they will be pretty impressed as well.

Matt
Thanks Matt. Yes, I drop by the body shop about once a week to ask them some question or another - they are really helpful and also into the project. Usually they say something like I should be working there with them, but I definitely don't want have an actual job doing this... that would take all the fun out of it! :)
 
Jeff,
Awesome find for a CHMSL. As you know, with our 8's, the rollbar covers the top half of the cab as I've been thinking how I could do something similiar that had a bed light too. I have a Delphi SKYFi radio that I would like to mount in my scram. The antenna for it is very similiar to what you show in your picture. Would you have any other suggestions for a overhead console for use in our traditional fiberglass half-cabs? Thank you for taking time to conintue sharing your work and ideas. Duane
 
drscanman said:
Jeff,
Awesome find for a CHMSL. As you know, with our 8's, the rollbar covers the top half of the cab as I've been thinking how I could do something similiar that had a bed light too. I have a Delphi SKYFi radio that I would like to mount in my scram. The antenna for it is very similiar to what you show in your picture. Would you have any other suggestions for a overhead console for use in our traditional fiberglass half-cabs? Thank you for taking time to conintue sharing your work and ideas. Duane

Duane,
Maybe you could build a small enclosure that mounts on the underside of the roll bar to house a CHMSL like the one I'm using. Mine requires about 2" of clearance inside the cab, so an enclosure for it could fit on the underside of the roll bar.

The problem with the overhead consoles is that most of the ones you'll find in other vehicles mount on a curved roof surface, and the inside of the CJ roofs are fairly straight. The Chevy van one I'm using mounts on a perfectly flat surface, so it's a good candidate for a Jeep. I've seen photos of a medium sized console from an S-10 pickup that might be able to be adapted, the curve on the bottom doesn't seem too bad. Or you could fabricate something from scratch, I've seen examples of those on other boards and websites - a search should turn up some ideas. One thing about the console I'm using - if you didn't want the storage compartment in it, it would be easy to build a switch panel to put in the opening of the compartment. Lots of guys seem to want overhead consoles with lots of switches for accessories, this would be a good way to do that.

I had to put the top on the Jeep today to do some fitting for the headliner, here's a shot I took of the console in place (ignore the loose wire, I haven't attached it yet :) ). I think it looks right at home in the Jeep.

Monday I'll be making the headliner, that will cover up the roof, console bracket and wiring so things will look a lot nicer.

attachment.php
 
jscherb said:
Thanks for the offer but I'm going to build a cardboard headliner covered with headliner fabric (like factory types), same as I did in my CJ8 World Cab - on that one I put some Dynamat on the inside of the roof, then some fiberglass insulation, then the headliner. Here's a photo of the CJ, I don't think I ever posted pics of the CJ headliner project before...

attachment.php

I am really interested in what you did there... do you have pics of stages? And, possibly the most important to me, is what product did you use to stick the headliner to the cardboard? I've used Super 90 and it always sags.

Point is, I'd love to build a headliner like you did, to cover dynamat, like you did to cut noise with the hard top... and my biggest single hangup is product.

But since you've done it already, I'd love to see step by step if you've got it.
 
over2land said:
I am really interested in what you did there... do you have pics of stages? And, possibly the most important to me, is what product did you use to stick the headliner to the cardboard? I've used Super 90 and it always sags.

Point is, I'd love to build a headliner like you did, to cover dynamat, like you did to cut noise with the hard top... and my biggest single hangup is product.

But since you've done it already, I'd love to see step by step if you've got it.

I'll be posting photos and info Monday as I make the headliner for the pickup. If your questions aren't answered when I post that, I can provide additional info about the Scrambler headliner project.
 
Thank you for sharing ideas and insight. I will poke around the Tractor Supply Company and Rual King store in area to start.
 
jscherb said:
I'll be posting photos and info Monday as I make the headliner for the pickup. If your questions aren't answered when I post that, I can provide additional info about the Scrambler headliner project.

Sweet, thanks.
 
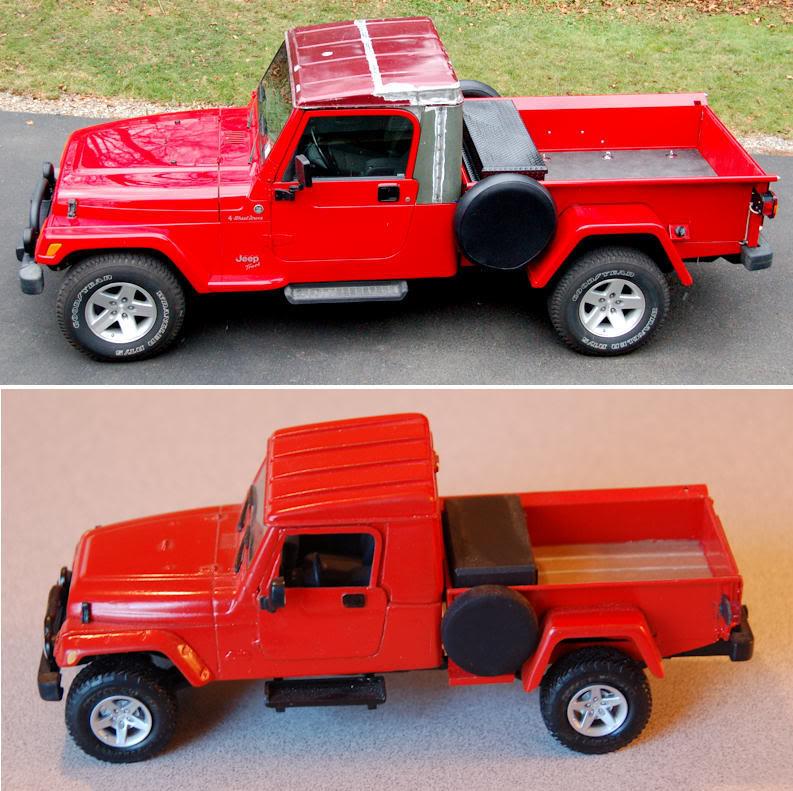
Someone today was telling me they couldn't wait to see the hardotp painted because they were having trouble imagining what the finished truck would look like, so I put this pair of photos together.

Here's a question... which one is the model? I made the 1:25 scale Jeep to show what the 1:1 scale finished project would look like, so is the 1:25 one the original and the 1:1 Jeep the model? :)

Comparison-1.jpg
 
Got the headliner done today - the first group of photos below shows the almost finished product. Second set are the "how to" photos.

attachment.php


First step was to install channels to hold the headliner, I modified some carpet edge strips I got at Lowes (photo 1). Then I glued two pieces of 1/8" cardboard together to make one piece large enough for the whole roof, cut it to size and shape, and folded where necessary (photo 2). Finally I used spray adhesive to cover the cardboard with headliner fabric I got a JoAnn Fabrics at the mall.

The channels are ordinary carpet edge strips, like you might use at the edge of your carpet at a hardwood or tile floor. They have little barbs to hold the carpet but for this application I hammer them down. They usually come in gold or silver anodized aluminum but I'll spray them semi-gloss black. The idea is to position the strip so the cardboard can be pushed up over the edges of them to snap in place. Some fiberglass insluation between the inside of the roof and the cardboard will keep a little pressure on the cardboard so it stays in place in the carpet strips, and improve insulation and sound deadening. The headliner is easily removable by pushing it up and out of the edge of the channel. I've left a gap in the channel at the rear of the top, that's due to close clearance with the back of the roll bar at that point.

I got the cardboard at Utrecht Art Supplies (www.utrecht.com), it is called .120 Chipboard and comes in 30x40 sheets. I make up larger pieces by butting sheets together, and gluing a 2-3" wide strip of chipboard over the joint with polyurethane glue (like Gorilla Glue). This forms a strong and permanent bond. I bought a box of ten back when I was doing the Scrambler World Cab headliner, I think I used 6 sheets for that. The pickup took two sheets so I've got two left over for some future project. Photo 3 shows the cardboard in place for a test fit before the fabric was glued to it.

Tip about gluing the headliner fabric to the cardboard: the best adhesive to use is spray-on contact cement. I used 3M Insulation 78, but there are many good ones out there. Position the fabric, fold half of it back (photo 4), spray the cardboard and the back of the folded part. When the contact cement is dry, carefully roll the folded part back down and when in place, press hard to set the cement. Then fold back the other side and repeat the process for that side.

attachment.php
 
Last edited:
Jeff,

Thanks, that's some great info and pictures.

Don
 
When do the garage door openers get integrated into that overhead console? ;)

Looks fantastic, what's left before it goes for paint?
 
bigwalton said:
Looks fantastic, what's left before it goes for paint?

The fabrication and fitting is now done. All that's left is to prep the exterior for paint, which involves stripping the paint off the roof panel, and some body filler and smoothing on the roof and the side/rear walls. I'm most of the way done on the side/rear walls, I've been doing that in-between the other tasks.

My plan has been to get everything fabricated and fitted before I did the final work on the exterior, and especially before paint, so that when the paint is done there's nothing left except assembly. The headliner was the last part, everything is built now and everything fits as intended.

I'll probably start tomorrow morning with stripping the paint off the roof panel. I was going to do that a few weeks ago but decided there wasn't any reason to do it until it was time for final panel prep.
 
Looks great, Jeff! Great write-up too. I never thought about using that type of cardboard.
I have used Hardboard- 4' X8' sheets at Lowes, about 3/16" thick, it works great but it's a bit heavy. How does the cardboard handle sagging and humidity?
Can't wait to see it in paint!!!
 
Randyzzz said:
Looks great, Jeff! Great write-up too. I never thought about using that type of cardboard.
I have used Hardboard- 4' X8' sheets at Lowes, about 3/16" thick, it works great but it's a bit heavy. How does the cardboard handle sagging and humidity?

This cardboard is very similar to the cardboard that was used in the original headliners for the World Cabs, only a little thicker, I have a set of originals I used for patterns when I made new headliners for my World Cab. I haven't had any problem with sagging or humidity on that one.

As for the write-up, thanks! I've made a list of topics I'll write up over the next month, things I've learned during this whole project; mostly sheet metal, body work and tool tips. I'll start writing them as soon as I get the top to paint, then I'll have a little time to write...
 
Any thought to the top being black? I have always liked the 2-tone look of our removable hardtops being black...
 
twmattox said:
Any thought to the top being black? I have always liked the 2-tone look of our removable hardtops being black...

No thought of that... I want it all to be the same color.
 
Here's the rest of how the interior is being finished off - the top two photos show the roof panel with the Dynamat in place (not stuck down yet, will do that after paint), and then fiberglass insulation. The insulation is way too thick in this photo, when I do final assembly I'll thin it the right amount to provide just a little tension to hold the headliner in place.

The second two photos show the inside of the side walls, they get the same Dynamat treatment, followed by carpet. Everything that's still green now will be painted red.

This combination of Dynmat, insulation, headliner and carpet will make the top very quiet.

Now I've got to go out to the garage to strip the old paint off the roof... photos later...

attachment.php
 
Last edited:
Back
Top