• Notice for iPhone users: DO NOT use the image size reduction option when uploading photos to the forum. This causes portrait images to post as landscape. We have added a warning to the image insert pop-up as well.

OT: Retro Wrangler/Willys Pickup (long)

The hot rod shop is sewing the soft top tomorrow, so if it is finished in one day I'll post pix tomorrow night. Otherwise will post pix as soon as it is done. He thinks it is a one-day job... I hope!

The body shop is expecting me at 8am Monday morning to begin the paint process. I'll disassemble the bed from the frame at their shop and them let them have at it. Of course pix will be posted as I can snap them.

Should be two weeks or less now until we can call phase 1 completely done.

jeff
 
Soft top sewing is coming along... slowly. I guess he's had many interruptions :(. It is going according to plan and is looking pretty good so far. Hopefully finished tomorrow. Pics as soon as it is done.

Took the old Willys bed, the NT axles, the remaining LJ frame parts and a bunch of other small misc steel bits to the recycler today - 940 pounds! Today's rate was 0.06 per pound, so it was a whopping $56.00 windfall :)

Jeff
 
Jeff,
The tool box you aquired for the bed of your Jeep Truck, would it fit in our traditional CJ8 bed? Duane
 
drscanman said:
Jeff,
The tool box you aquired for the bed of your Jeep Truck, would it fit in our traditional CJ8 bed? Duane

Duane,
I don't think it will fit between the Scrambler's wheel wells, but I haven't measured. Here's the dimensions, 46.5 x 19w x 17h, it is Tractor Supply #1099507, I'm sure you can find it on their website.
Jeff

EDIT: I measured the distance between the wheel wells on my Scrambler today, it is roughly 36". So the answer to your original question is no, it won't fit in a Scrambler.
 
Last edited:
"Jeep" Bed Mat

Man this is one well executed and KICK AZZ project.
I thought when I built my Scrambler that I was well a organized NUT. :o
I thought I paid too much attention to detail.:confused:

But U have clearly made me feel better as not being the ONLY detail Jeep nut on this planet.:bow:

The ONLY criticism I have (and I've been lurking) is the bed mat, U need this:
http://i226.photobucket.com/albums/dd178/RedScrambler/DSC00717.jpg
http://i226.photobucket.com/albums/dd178/RedScrambler/DSC00988.jpg
http://i226.photobucket.com/albums/dd178/RedScrambler/DSC00989.jpg
http://i226.photobucket.com/albums/dd178/RedScrambler/DSC00987.jpg
http://i226.photobucket.com/albums/dd178/RedScrambler/DSC00986.jpg
http://i226.photobucket.com/albums/dd178/RedScrambler/DSC00990.jpg

Just cover the ride which will probably cost $100 by UPS.

It will be worth giving it away to me to see what U come up with for cutting it.:)
Not to mention a worthy project!
P.S. I've tried a sharp knife along a ruler, nope; skillsaw blade on backwards, just kicks back.
I think need some kind of a metal cutting shear or a hot knife.
 
The soft top is done and it worked out great! Unfortunately we finished after dark so the only photo I can show you tonight is this work in progress shop in the Hot Rod Shop. I'll do some additional photos tomorrow.

HotRodShop-1.jpg
 
red mistress said:
Man this is one well executed and KICK AZZ project.
I thought when I built my Scrambler that I was well a organized NUT. :o
I thought I paid too much attention to detail.:confused:

But U have clearly made me feel better as not being the ONLY detail Jeep nut on this planet.:bow:

The ONLY criticism I have (and I've been lurking) is the bed mat, U need this:
http://i226.photobucket.com/albums/dd178/RedScrambler/DSC00717.jpg
http://i226.photobucket.com/albums/dd178/RedScrambler/DSC00988.jpg
http://i226.photobucket.com/albums/dd178/RedScrambler/DSC00989.jpg
http://i226.photobucket.com/albums/dd178/RedScrambler/DSC00987.jpg
http://i226.photobucket.com/albums/dd178/RedScrambler/DSC00986.jpg
http://i226.photobucket.com/albums/dd178/RedScrambler/DSC00990.jpg

Just cover the ride which will probably cost $100 by UPS.

It will be worth giving it away to me to see what U come up with for cutting it.:)
Not to mention a worthy project!
P.S. I've tried a sharp knife along a ruler, nope; skillsaw blade on backwards, just kicks back.
I think need some kind of a metal cutting shear or a hot knife.


Thanks for the nice comments! Yes, that's a cool bed mat. What are the dimensions of the mat between the wheel wells? My bed floor is 4' wide. This one looks plenty long enough, my bed is about 78".

If it is wide enough we should try to make it work... let me know.

Thanks,
Jeff
 
jscherb said:
The soft top is done and it worked out great! Unfortunately we finished after dark so the only photo I can show you tonight is this work in progress shop in the Hot Rod Shop. I'll do some additional photos tomorrow.

N I C E ! ! ! ! ! ! ! ! Can't wait to see the pics tomorrow!
 
see pics

I can't remember length but it's a Jeep Bed mat for FSJ Truck shortbed 7' long. Width is just hair over 48". Pics show tape measurements. This one has already been cut (trimmed) to fit around aux. fuel tank...or would be bad Jeep Carma to ruin. (Even though this is most worthy project) It's faded somewhat as the FSJ & CJ-8 mats were mfg. for one year only in 81. Soo won't look as rich & Black as the one in UR truck now. I have a NOS tailgate mat for Scram and while it's darker, the white bias ply tire cords show thru in places. It's probably 5/8" thick tire and has little bumps on bottom to let air underneath. Weighs a good 80#. I've got a FSJ Truck tailgate mat also but can't decide if I want to drill holes in an almost flawless 40 year old Red Origional paint tailgate or not. Let's see what U come up with to cut a nice clean cut as I need to trim 3/4" off my Scrambler mat to fit the tailate with weatherstrip. I've got faith that U will think of somethin'.
 
red mistress said:
I can't remember length but it's a Jeep Bed mat for FSJ Truck shortbed 7' long. Width is just hair over 48". Pics show tape measurements. This one has already been cut (trimmed) to fit around aux. fuel tank...or would be bad Jeep Carma to ruin. (Even though this is most worthy project) It's faded somewhat as the FSJ & CJ-8 mats were mfg. for one year only in 81. Soo won't look as rich & Black as the one in UR truck now. I have a NOS tailgate mat for Scram and while it's darker, the white bias ply tire cords show thru in places. It's probably 5/8" thick tire and has little bumps on bottom to let air underneath. Weighs a good 80#. I've got a FSJ Truck tailgate mat also but can't decide if I want to drill holes in an almost flawless 40 year old Red Origional paint tailgate or not. Let's see what U come up with to cut a nice clean cut as I need to trim 3/4" off my Scrambler mat to fit the tailate with weatherstrip. I've got faith that U will think of somethin'.


Duh, what a dummy, I didn't look at every picture last night because my family was rushing me to do something, so I didn't see the ones with the tape measure. Sent you a pm.
 
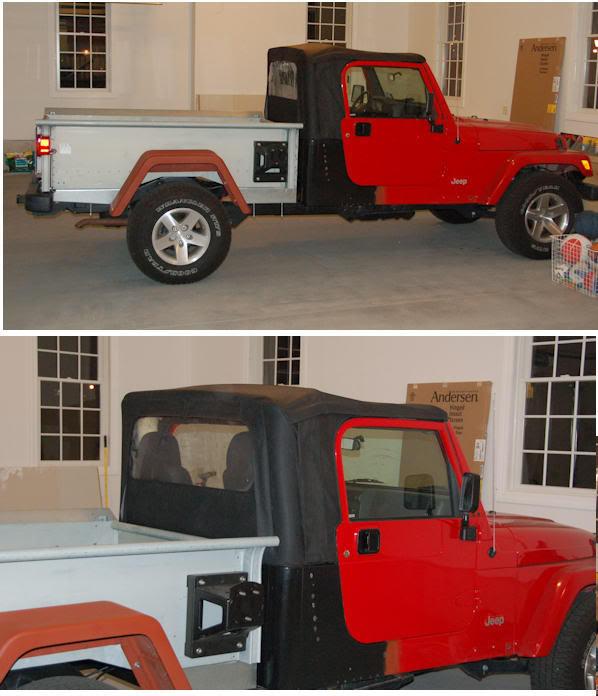
I parked the truck in the garage at the new house last night, intending to take it to the old house first thing in the morning to work on it a bit, but it is raining so the truck is a prisoner here - too many things not painted yet to drive it in the rain :(

So these two pics in the garage will have to do for now.

About the top - it is stock from the windshield header back to the first bow. We cut the top panel off at the rear wall and sewed the two together there. The rear wall on the stock top is angled about 8 degrees forward, but that wouldn't look right on a pickup, so when I reengineered the rear bow I set it up so the rear wall would angle back a degree or two. This also provides more room to lean the seats back.

The side panels are the stock window panels with the window section cut out of the center. They attach in the stock way. Because of the different angle of the rear wall, we had to resew the curve of the zippers to the new angle.

The rear window still zips out, but we changed the size of the "glass" to be a more appropriate smaller pickup window. No changes were necessary to the zipper, but we did add a plastic strip all along the bottom to slide into the lip on the tub to secure the window - the Brute tub has a lip all along the back just like the regular tub has lips along the side; the plastic strip was removed from one of the side windows and reused.

The Sunrider sunroof still works as stock because the top is stock from the windshield back to the first bow.

Since the top attaches and seals exactly like the stock top, this will be as weather- and wind-proof as the stock top. It is very tight and I drove it on the highway at speed last night to test it and it is really quiet, probably a little quieter than the stock Unlimited top, which is very quiet to begin with.

The modified top definitely looks "factory" - so I'll declare victory on this part of the project and move on to the next step - the truck goes into the body shop Monday morning for painting.

Jeff

SoftTop1-1.jpg
 
Last edited:
As much as I want to see you do the work and all, I have to be honest and say that I like this top better than the hard top if the model is close to the actual size version.

I just like the lines better with the soft top and it looks SO factory, the hard top is just too far from what a modern Jeep comes with that I don't know how it could look more "right" in my eyes than this.

I like the looks of the LJs better with soft tops than the factory hard top. That probably feeds into my opinion too...


Regardless, that's just FANTASTIC, I hope the rain lets up for you to drive it some more before paint. I REALLY can't wait for the pictures after paint!!! :bow: :cheers: :thumbsup:
 
Jeff, all I can say is WOW. That is a work of art. You have out done yourself my friend.

Truck
 
bigwalton said:
I just like the lines better with the soft top and it looks SO factory, the hard top is just too far from what a modern Jeep comes with that I don't know how it could look more "right" in my eyes than this.
You mean, the 1946 Chevy pickup bed I used looks more factory than the Jeep OEM World Cab parts I plan to use for the hardtop? ;) hee hee couldn't resist that one... I agree the soft top looks totally factory, I guess it should since it is a factory top with really only small modifications. The shape and lines of the modified top did work out even better than I imagined they would, I'll have to admit. I'm sure what I'll do is run the soft top in the warm season so I can use the Sunrider, and for the cold season I'll use the hard top. But it will be a few months before I start and finish the construction of the hard top so you can enjoy the soft top for now.

bigwalton said:
Regardless, that's just FANTASTIC, I hope the rain lets up for you to drive it some more before paint. I REALLY can't wait for the pictures after paint!!! :bow: :cheers: :thumbsup:
Randyzzz said:
That top looks great! :bow:
Truck said:
Jeff, all I can say is WOW. That is a work of art. You have out done yourself my friend.
Thanks everyone for the nice words. Without your encouragement through this whole project I probably would have stopped at the 1:25 plastic model stage.

Today I finished building the CHMSL ("Center High Mounted Stop Light") before I started disassembling everything to prepare for paint. The CMHSL mounts on the rear bar of the soft top, inside the window. It's a narrow LED unit. I wasn't originally going to do a CHMSL for the soft top but then I started getting worried if I'd get dinged on state inspection so I decided I should do one.

While I was wiring the CHMSL I added several other functions the the top harness - power for the bed light that is part of the Dodge Dakota CHMSL I plan to use on the hardtop, and running light power - I'm seriously thinking of putting yellow clearance lights along the front edge of the hardtop. We can debate that one when the time comes, I'll need your input on that decision.

The truck is ready to go to paint Monday morning, I'll drive it over to the shop and complete the disassembly of the bed. Not sure how long they'll have it, I'm guessing I'll get it back sometime next week if all goes well.

And Eric, NOBODY is looking forward to seeing it in paint more than me, trust me on that one!
Jeff

attachment.php
 
The paint process has started, here's a shot I took as I was leaving the body shop this morning. They think it will be sometime later next week that they'll be done. I'll try to post in-progress shots as I can.

The tech that will be working on it has a really nice hot-rodded 46 Chevy pickup (same bed as I've got), so it's pretty cool for him to work on this. Everyone at the body shop this morning was very complimentary about my build which was nice to hear - since I'm an amateur on my first build it is nice to have professionals say nice things about my work... :)

Jeff

attachment.php
 
I know the bed is retro, but it doesn't look retro when behind the LJ front end.

Awesome to know the paint is underway...
 
Opinions on graphics please

While the truck is in the paint shop I'll get the local sign shop to make the vinyl graphics for me. I plan to reproduce a number of old Willys and Jeep emblems in vinyl - even though I've collected all of the original chrome emblems for these, I think vinyl is more fitting for a modern Jeep. I'll use silver vinyl which matches the silver used on the original Unlimited (all of the original graphics that were on the Unlimited are now removed).

Here's what I'm thinking:

- The large embossed "Jeep" letters on the tailgate (taken from my Scrambler tailgate) will have vinyl letters overlaid.

- There will also be a "4 Wheel Drive" emblem on the tailgate. I don't know if I'll use the "curved" logo from the old Willys CJ's (everyone's familiar with that one) or if I'll use the "art deco" logo from the early 60's Gladiators. Take a look at both and give me your opinion. The curved one is a safe choice because everyone is familiar with it, but I really like the art deco one too. A photo of an original deco one is below.

- I'll put "4 Wheel Drive" script emblems on the side of the hood like on the old Willys pickups and wagons. Below is a photo of a Wrangler that someone else has done that to.

- The "Jeep" logo that goes on the "Joop" embossing on the lower side of the front fenders will also include the word "Truck". This is taken from an emblem from the '47 Willys pickups. A photo of an original is below.

What do you think? Too much, too little, wrong choices? Something else I should do? Leave some of this off? Any votes for using the original chrome emblems? "Curved" 4 Wheel Drive or "Art Deco" 4 Wheel Drive on the tailgate? White vinyl instead of silver? Let me know what you think so I can finalize all this by the time the paint work is done.

Thanks in advance for your input everyone.
Jeff

attachment.php


attachment.php


attachment.php
 
Retro

I like the old emblems, mostly because I have them on the 67 Gladiator truck, and spent countless hours polishing and painting them.

They probably wouldn't look good with the smooth lines (modern vehicle) U have going.

Soo I vote for the vinyl. Maybe not make all of them silver???
 
Back
Top